June 24, 2014

Kimchi Fried Rice with Egg

When I was studying in Vancouver, I lived by myself and I would cook dinner for myself on weeknights. It was cheaper than ordering in and I could avoid the copious amounts of MSG, grease and bad oils that came with delivery food. I'm Chinese, so naturally, I had a rice cooker and made rice all the time. And what to do with leftover rice? Make fried rice! I usually just add in anything I could find my fridge, like eggs and turkey slices from the deli, finishing the rice off with a squeeze of Sriracha. However, for a more decadent but still super easy and quick weeknight dinner dish, I present to you my kimchi fried rice! The main ingredients are kimchi, spam, and eggs. And if you have leftover rice from the day before, this dish will take you less than 15 minutes to make. Take that, Jamie Oliver! 


This dish will amaze you. It is so simple to make and uses such humble ingredients, yet it has a myriad of flavours and textures: savoury crunch from the spam, spicy tangy and sweet from the kimchi, richness from the sesame oil and egg, and that layer of umami from the nori. 

The runny yolk forms a beautiful “sauce” that oozes into the rice, calming the sharp kick of the kimchi. This dish not only tastes good but also looks good. Instagram that #foodporn!

Recipe

Serves two

Ingredients

1 tablespoon vegetable oil, plus more for coating rice
1/2 cup cubed spam or sausage or ham
3 cups day-old cooked white rice (or you can cook the rice and put in the fridge to cool down)
1 ½ cup chopped kimchi, plus any juices
1 tablespoon gochujang (this is a spicy Korean paste made with red chili and fermented soybeans. I usually put in two heaped tablespoons for this recipe, but you should start out with one and taste first)
1 teaspoon sesame oil
2 eggs
Nori (dried seaweed), chopped, for garnish
1 stalk scallion (green parts) or spring onion, sliced, for garnish

Method
  1. Heat the vegetable oil in a large pan or skillet over medium heat. Add the spam and cook until crispy but not burnt, around 2 minutes.
  2. Meanwhile, place the cooled rice in a large bowl and drizzle with a little vegetable oil. With your hands, coat the rice grains with the oil, separating the grains carefully as much as you can without breaking them. 
  3. Turn the heat up to medium-high, add the kimchi and juice and stir, until heated through, about 2 minutes.
  4. Add the rice and gogujang paste and toss to coat, mixing the ingredients evenly. Stir the mixture around for about a minute to make sure all the rice is colored. Drizzle in the sesame oil.
  5. Turn the heat down to medium-low and pat the rice mixture down in the pan in an even layer. Let the rice sit for about 5 minutes. The bottom layer will crisp up and the flavor will be intensified.
  6. Add the scallions or green onion into the mixture, stirring to distribute evenly, or leave them as a garnish. Divide the rice mixture into 2 bowls.
  7. In a small pan, fry the eggs until the whites have set but the yolks are still runny.
  8. Garnish with the scallions and nori.

June 23, 2014

Caesar Salad with Parmesan Croutons

I try to make “healthy” things from time to time to keep the monster of gluttony inside me at bay. I usually make a salad as a starter for dinner, something simple like cherry tomatoes and arugula with balsamic and olive oil. But tonight I felt like splurging and making something I loved eating when I was young and still do: Caesar salad with crunchy croutons and bacon bits. It was the only salad I ate as a child. That creamy tangy dressing pretty much covered any vegetable taste (yay!) and there was bacon! I still remember my dad had this plastic container of bacon bits in the kitchen and we would sneak a handful like candy now and then.


Regardless of how delicious the salad is, it isn’t healthy to have Caesar dressing from a bottle and bacon when you are cooking at home and can make better choices. So I found a recipe online and tweaked it to make my own Caesar dressing. Much healthier and just as delicious! You can still have a whole bowl of this salad and not feel like you had a full meal. You can omit the Parmesan, but I think a little bit won’t hurt!

Recipe

Ingredients

Romaine lettuce, cut into 1-inch chunks

Croutons:
Bread, cut into small cubes (the recipe called for crusty bread, but I just used plain old white bread)
1 tablespoon olive oil
2 tablespoon Parmesan, shredded

Dressing:
Olive oil
2 egg yolks
2 teaspoon Dijon mustard
Splash of Worcestershire sauce
1 small can of anchovies, chopped
½ clove of garlic, minced
1 tablespoon lemon juice
Salt
Pepper
Parmesan, shaved

Method
  1. For the croutons, heat the olive oil in a pan and fry the bread on low heat until golden and crispy. Add the Parmesan on top. When the cheese has melted, remove the bread and drain on kitchen towels.
  2. For the dressing, blend the egg yolks, mustard, Worcestershire sauce. Then slowly drizzle in the oil, whisking constantly, until the sauce is of a mayonnaise consistency. Then mix in the anchovies, garlic and lemon. Season with salt and pepper.
  3. Mix the dressing with the lettuce, and top with the croutons and more shaved Parmesan.


June 13, 2014

Roasted Brussel Sprouts

Everyone loved the cookies. I think my boyfriend must have eaten at least four in a row! We probably have to spend some extra time at the gym to make up for it.

Apart from sweets, I enjoy cooking savory things too. I used to cook for myself almost every weeknight when I was studying abroad, and now I usually cook on the weekends with my family as guinea pigs. One of the easiest sides to whip up and impress with flavor are roasted brussels sprouts. I absolutely hated them until I made this recipe for a special request. I had only eaten the boiled icky kind before so I was hesitant to try roasting them. But now I am a convert and I love them roasted like this. They are super easy to make! You just cut them up and put them in the oven. I add bacon to give it extra depth in flavor and I find that it helps caramelize the sprouts more to make them sweeter.


MmmMMMm crispy bacon and caramelized sprouts!

Recipe

Ingredients
  • Brussel sprouts (one pack should be enough for 2 people as a side)
  • Kosher salt
  • Freshly ground pepper
  • Olive oil
  • Bacon, chopped
Method
  1. Preheat oven to 195C/380F.
  2. After rinsing the sprouts, remember to drain well or else they will be harder to crisp up in the oven.
  3. Chop the hard stem off the bottom of the sprouts and then in half.
  4. Put the sprouts on a baking tray in one layer and toss with oil, salt and pepper.
  5. Put the bacon evenly throughout the layer of sprouts.
  6. Bake for 30 minutes* or until the sprouts become crisp 

*Depending on your oven, you may have to check the sprouts at the 15-minute mark to make sure they don’t burn.


June 12, 2014

Chocolate Chip Cookies with Sea Salt


It’s only fitting to start my new blog with one of the most loved (and easy) recipes of all time. I absolutely love chocolate chip cookies. But it’s even better with a sprinkle of sea salt! I find that the salt brings out the richness of the chocolate, and makes the cookie even more flavorful. This recipe uses dark or semi-sweet chocolate, but feel free to substitute for milk. There is also Greek yogurt in this recipe, which makes the cookie moist. Enjoy! These will surely impress anyone.


Brown butter – this creates an amazing hazelnut aroma which adds richness to the cookies. Make sure not to over brown it or it will taste bitter! Keep whisking!


Blend the sugars with the butter.


Add the dry ingredients bit by bit. Stop mixing once all the flour bits are gone.


Add the chocolate chips. I only had dark and semi-sweet at home, which were of different brands and sizes. But I guess the cookies turned out looking okay!


I made one batch of 16 without sprinkling sea salt on top, and one batch with. Both came out delicious.


Recipe – adapted from Serious Eats

Makes 32 medium cookies

Ingredients

  •  2 ¼ cup all-purpose flour
  • 1 ½ teaspoons baking soda
  • ½ teaspoon of sea salt, plus more for sprinkling
  • 1 cup (2 sticks) unsalted butter
  • 1 ½ cups packed dark brown sugar
  • ¼ cup granulated sugar
  • 1 egg plus 1 egg yolk
  • 2 teaspoons vanilla extract
  • 1 tablespoon plain Greek yogurt
  • ¾ cup semi-sweet chocolate chips
  • ¾ cup dark chocolate chips


Method
  1. Melt butter in a saucepan over medium heat. The butter will begin to foam. Make sure you whisk consistently during this process. After a couple of minutes, the butter will begin to brown on the bottom of the saucepan. Continue to whisk and remove from heat as soon as the butter begins to brown and give off a nutty aroma. Immediately transfer the butter to a bowl to prevent burning. Set aside to cool for a few minutes.
  2. Whisk together the flour, baking soda, and salt in a bowl and set aside. 
  3. Whisk butter and sugars until blended. Beat in the egg, yolk, vanilla, and yogurt until combined. Add the dry ingredients bit by bit and mix until combined and you don’t see anymore of the flour.
  4. Stir in the chocolate chips.
  5. Chill your dough for 2 hours in the refrigerator. This makes it easier to form the dough into balls and keep a uniform shape when baking.
  6. When the dough is chilled, preheat the oven to 350F/175C.
  7. Use a tablespoon and measure out the dough to roll into balls. I used about 2 tablespoons per dough ball. Place dough balls on cookie sheet, 2 inches apart and sprinkle each dough ball with a little bit of sea salt.
  8. Bake the cookies 8-10 minutes or until the edges of the cookies begin to turn golden brown. Mine were done at 8 minutes. They will look a bit underdone in the middle, but will continue to cook on the baking sheet when out of the oven. Cool the cookies on the sheets and sprinkle with a little sea salt. 
  9. Remove the cooled cookies from the baking sheets after 5 minutes and transfer to a wire rack to cool completely.

June 18, 2011

Los Angeles - Umami Burger

Did not get out of bed until 2pm I believe. Thank goodness I had eaten a hot dog before going to bed or I would've woken up with the worst hangover. We decided to hit up Umami Burger for a late lunch. Umami has multiple locations all over LA and around the US. We arrived at the La Brea location around 3:30pm and waited almost an hour for a table. We were starving by the time we finally got seated. The interior did not look like your average burger joint. This was a high-end restaurant with sleek modern decor. Overall, delicious food. I think their signature burger was one of the best burgers I've ever eaten. I hear some locations are better than others though. Now if only Umami would come to Hong Kong...


Iced Green Tea: a bit on the sweeter side

Market Salad: fresh crisp greens, tangy vinaigrette dressing

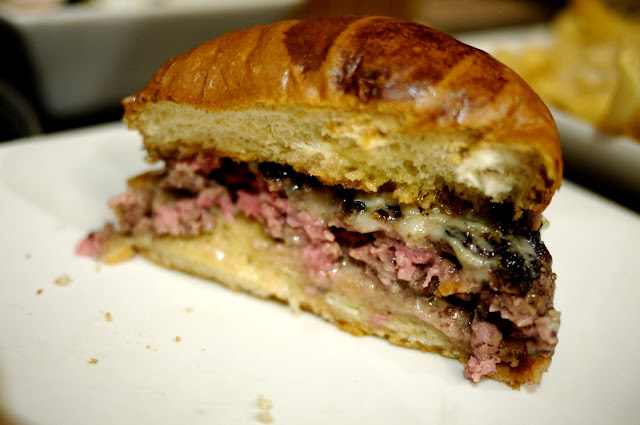
Truffle Burger: delicious patty topped with house made truffle cheese and brushed with truffle glaze. I think what makes Umami's burgers stand out is their soft, toasted, slightly sweet buns. It really brings the whole burger together.

Umami Burger: Their signature burger: patty + parmesan crisp + tomato + onions + Umami ketchup = burger heaven. All the flavors and textures combined really well. This burger had a slight Asian taste to it. I think it was probably in the seasoning of the patty and the homemade ketchup. The patty was juicy and well seasoned, the onions were sweet, and the parmesan crisp added a nice savoury crunch. They make their own ketchup, which tasted fresh and "umami" (sorry I couldn't think of a better word!). You have got to try this!

Truffle cheese fries with Umami ketchup:  Fries were not too greasy, and the truffle cheese was fragrant. They skimped on the cheese though, as you can tell from the picture.

Verdict: Delicious burgers, long wait. Looking forward to my next visit though!

Update (July 14th 2014): This location actually closed down, but there are still 9 other locations in LA.